What's new
what's up with the esp ra.de. art on the bezel? Did it come with that? If it came with that, could you take some clear pictures of the stickers?
 
what's up with the esp ra.de. art on the bezel? Did it come with that? If it came with that, could you take some clear pictures of the stickers?
its art from sellsellsell. itl be hard to take off cuz i used double sided adhesive and never intended it to be removed. it will come off tho. i did the same thing on my egret 2's.
 
I picked up a couple of proper MS9 yokes (thanks, @ArcSys101 ) and the results speak for themselves. This is with just very quick geometry adjustments.

IMG_7373.jpeg


IMG_7375.jpeg


Thanks so much for your help, @Hatsune Mike
Looking pretty good; a little convergence tweaking and you'll be good to go
 
Beware eBay sellers who hack MS8-29 yokes to plug into MS9-29 chassis and market them as MS9-29 yokes, though (look for the yellow and brown wire pair).
In my case was opossite … China arcade shop owner sent me NAC equiped with A68KJU96X (6F - June 1996) with ms8-29 and he did some moddifications for NAC to use this chassis instead MS9-29… (i have ms9 spare and is time for me to replace MS8 - he start to make me troubles)
big helps from @kikaso and of course this theard too made me to understand new things🙏🏻


FEBB179F-5687-4EFD-BDDB-588EC817D4B7.jpeg
95ED4E01-7D76-47D9-BE66-43C1DED5EF42.jpeg
 
I think you would need to cut the yoke connector ends and use this connector. You would also need to split the connector in half given the vertical and horizontal connections on an MS9 are separate.

Can someone please confirm that?
 
If you're replacing a MS8 with a MS9, you need a different connector for vertical.

Looking at the pic posted, I would just replace both sets of connectors. The horizontal connector looks like a China special.
 
If you're replacing a MS8 with a MS9, you need a different connector for vertical.

Looking at the pic posted, I would just replace both sets of connectors. The horizontal connector looks like a China special.
What’s the correct connector to use for vertical and horizontal?
 
@kikaso can you confirm the size of the knurled thumb nuts you're using for the control panel? I swap panels often on Sega candies and making that job quicker would be awesome.

Great job on the restore btw. This has been very enjoyable to follow.
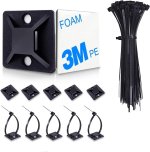
 
If you're replacing a MS8 with a MS9, you need a different connector for vertical.

Looking at the pic posted, I would just replace both sets of connectors. The horizontal connector looks like a China special.
In the MS8 chassis , the cables that comes from yoke looks like this … ive did this to compare to see if the connectors from Ms9 are in the same spots 🤷🏻‍♂️🙈
86BDB5D8-85E3-4155-8557-78F0EF7EB30D.jpeg
 
Last edited:
Very quick update!

Polished the monitor screen and it came out great. The screen looks to have been scuffed up with a Brillo pad or other abrasive material as seen in @imbord3rlin3 excellent candy cab buyer’s guide. The anti-glare coating came off along with the majority of the scratches.

I used cheap polishing pads that attach to a handheld drill and some automotive glass polish I had in the garage. The polish is a fine polish without too much cutting ability. I made about five or six passes alternating horizontal rows and vertical columns. There are still some scratches but they’re not very noticeable.

I would say it turned out really well!
 

Attachments

  • IMG_3106.jpeg
    IMG_3106.jpeg
    186.3 KB · Views: 52
  • china 2.jpeg
    china 2.jpeg
    124.9 KB · Views: 47
Very quick update!

Polished the monitor screen and it came out great. The screen looks to have been scuffed up with a Brillo pad or other abrasive material as seen in @imbord3rlin3 excellent candy cab buyer’s guide. The anti-glare coating came off along with the majority of the scratches.

I used cheap polishing pads that attach to a handheld drill and some automotive glass polish I had in the garage. The polish is a fine polish without too much cutting ability. I made about five or six passes alternating horizontal rows and vertical columns. There are still some scratches but they’re not very noticeable.

I would say it turned out really well!
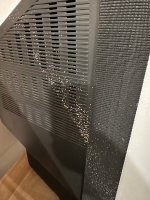
Looks great! I did that to one of mine. What a mess haha. I should do my others, too.
 
Another small update

I cut some new PCB mounting boards for the NAC. The size of the original board is 530 x 400 x 12mm and you get 12 boards out of one standard US sheet of 8 x 4’ plywood.
[][][]
[][][]
[][][]
[][][]

IMG_3148.jpeg


My other cabinet is a Capcom Mini Cute which has a smaller PCB mounting board, (450 x 360 x 9mm). I had been trying to think of a solution that would keep me from having to constantly unscrew a PCB from the Mini Cute board if I wanted to play it on the Astro and vice versa. All of my arcade PCBs are currently mounted on the Mini Cute boards since I had that cabinet first and also the boards are easier to store when not in use. I even built a storage cabinet that keeps the PCBs stored vertically.

IMG_2861.jpeg


What I came up with is to attach the smaller Mini Cute boards—PCB and all—to the larger Astro board. I installed T nuts onto the Astro board and made corresponding holes into the Mini Cute boards so that I can attach the boards using easy-to-remove M4 wing screws.

IMG_3212.jpeg


The boards stay firmly attached using just two of the screws. I used large 20mm washers so that I can better distribute the force when I screw the boards together and I used Forstner drill bits to keep the T nuts flush with the back of the Astro boards.

IMG_3220.jpeg


Another hurdle to accomplishing this was that the heavier arcade boards in my collection, (CPS1 multi) require that I use nuts and bolts to mount the PCBs to the boards. Screwing it down like I would with a Neo Geo one-slot or even a CPS2 boardset just wouldn’t work. The problem here is that the Mini Cute and Astro boards would have to sit flush for this to work cleanly and having a screw head or nut protruding on the back of the CPS1 multi board just wouldn’t work. Here is where I used the Forstner bits again to ensure that everything sat flush.

IMG_3221.jpeg


Not sure if similar-sized candy cabs have the same sized mounting boards but this is a pretty easy solution for those of us with very different sized arcade cabinets.

Thanks for reading!
 
Back
Top